FORTIFICATION OF A LINUX ENVIRONMENT by Fernando
![]()
Background
The activity will allow to put into practice the concepts related to Linux systems. Specifically, an Ubuntu system will be fortified, restricting access to privileged users, securely managing access via SSH, restricting web browsing with a proxy and creating users with specific permissions. The same company of the windows fortification has contacted us again to request the installation and secure configuration of a virtual machine based on VirtualBox and whose operating system is Ubuntu.
Contents
- 1 Creation and configuration of the virtual machine
- I. The virtual machine must have 4GB of RAM, 10GB of hard disk and a network interface in NAT mode.
- II. The user space, /home, must be on a separate logical volume.
- III. The hard disk must be encrypted with the key: disc0Unir.
- IV. The user created during installation will be bound with a key SSSO0Unir.
- 2 Secure installation and configuration of grub .
- V. The grub must be protected.
- VI. Secure su and sudo commands.
- 3 IPTables configuration.
- VII. OpenSSH server must be installed.
- VIII. Configure IPTables to only accept OpenSSH connections through port 22.
- 4 Script and create users and groups.
- IX. The users that are going to work on the machine are from the management and engineering area. Create a script that asks for the user name, password, group (if it does not exist it will be added) and if it is an administrator user to allow us to create users in the system. In addition, the script must verify if the user already exists in the system before adding him/her.
- X. Using the above script, create the user Engineering01 non-administrator with the password SSSO0Ing01 and another one Address01 with the password SSSO0Dir01. Allow for new users to be added in the future.
- XI. List the /etc/passwd file to verify that the existing users are the ones that have been defined.
- XII. The user Engineering01 will create a folder that belongs to all the users of the engineering area and in which they can read and write. In turn, the users of the management area will have read access to the content located in that folder.
- 5 Squid configuration. Finally, we are asked to set up a Squid proxy server with the following characteristics:
- XIII. Prevent users from browsing their personal emails from gmail.com, hotmail.com, yahoo.com.
- XIV. To restrict that no surfing can be done any day of the week between 8 and 10 am.
- XV. That the logs be stored in a file called messages.log.
- XVI. Install and configure the Firefox browser to use the configured Squid server and verify that the restrictions are correctly applied.
- Bibliography.
1. Creation and configuration of the virtual machine.
I. The virtual machine must have 4GB of RAM, 10GB of hard disk and a network interface in NAT mode.
For the creation use VMWare, this software allows to create virtual machines, it is the standard desktop hypervisor of the sector to execute virtual machines in PC with Linux or Windows. The first thing to do is to click on File-> New virtual Machine.

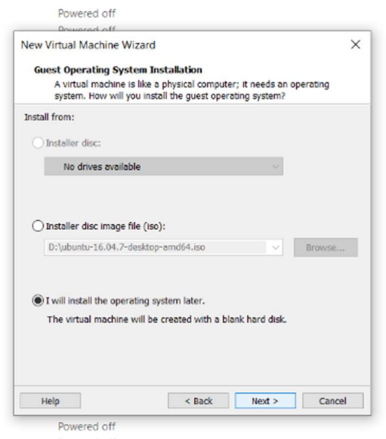
In order to be able to make the configurations requested in the activity it is required to make configurations prior to the installation of the operating system in question, in the case of VMWare it makes these previous configurations by its interface, so the only option is to load the ISO of the installation after creating the virtual machine so I will choose the option. I will install the operating system afterwards.
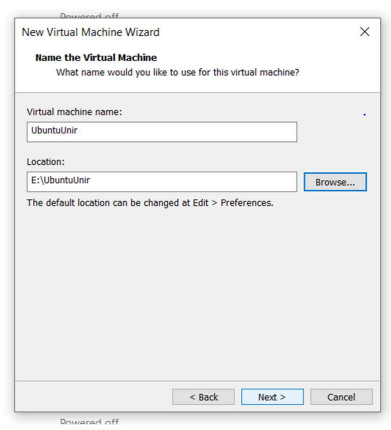
I select the location where I will install the virtual machine.
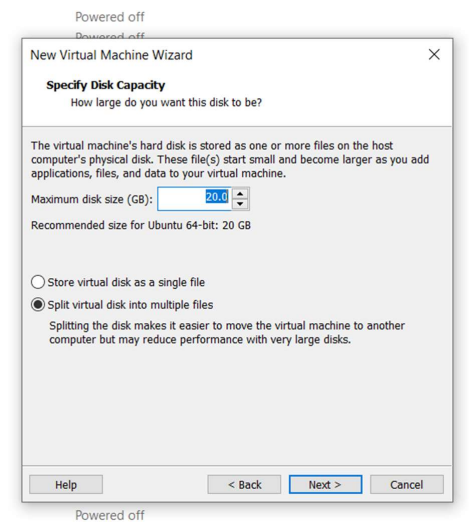
For ease of configuration I chose to give 20 GB to the disk of the machine.
I assign 4 GB of RAM memory to the virtual machine.

Now I can select the ISO of the operating system to install to load it as a CD when I boot the virtual machine.
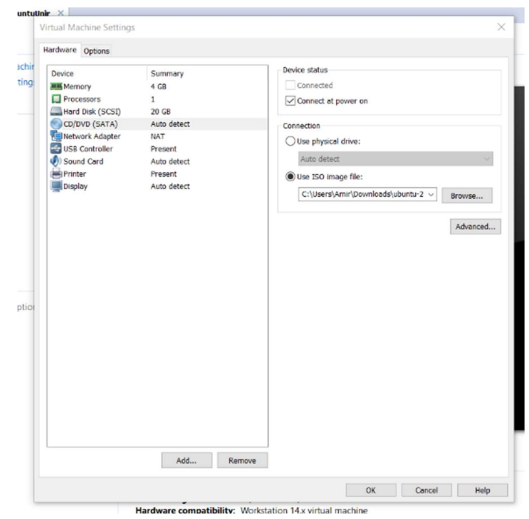
Unfortunately VMWare if installed normally asks for the user and password directly, but in this case as separate disks had to be created I had to add the iso after the configuration of the machine, to install it on my own.
II. The user space, /home, must be on a separate logical volume.
When loading the ISO, I select the Try Ubuntu option to perform the configurations. Also, to be able to check certain issues with the gparted program.
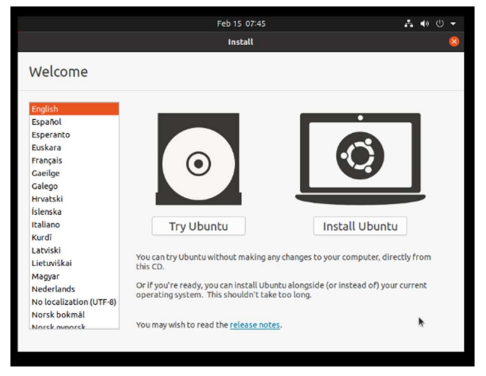
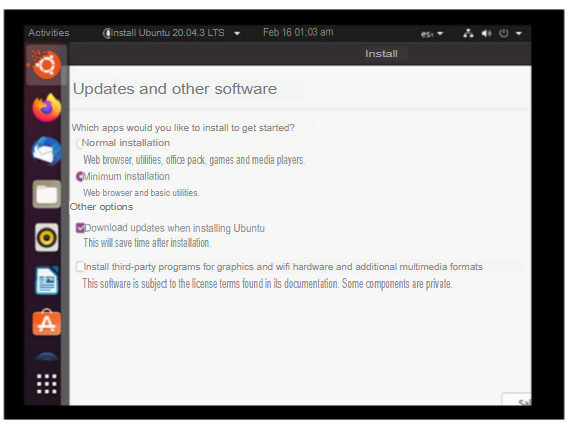
After a few trials and errors I realized that I could encrypt the disk without using commands, so I bypassed the use of commands from the terminal and continued with the usual installation software. (This I will explain with the future image, after this one). I select the minimum installation option.
As I mentioned previously I tried many ways to configure what was requested by the activity, the easiest way was to use the erase disk option, as this allowed to encrypt the disk within the advanced features options, but this went against one of the settings that was to create home as a logical partition, so what I had to do was to select more options because it allows me to configure the partition tables, although it did not allow me to encrypt at the same time at first glance, and this was something that worried me.
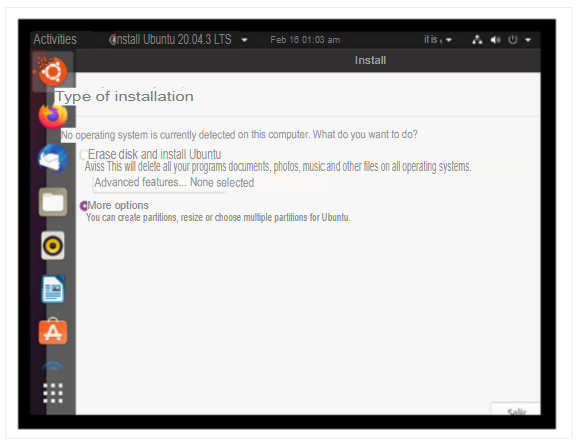
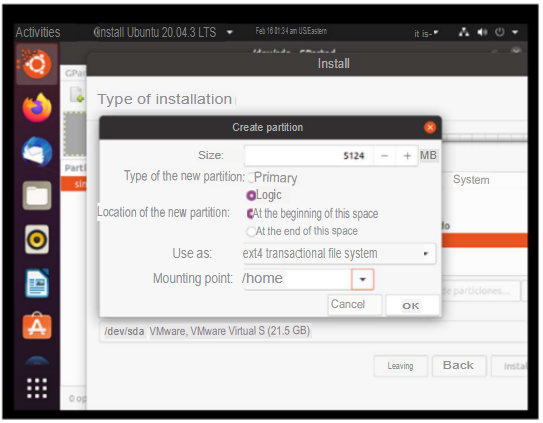
In the end I discovered that it was viable to encrypt the disk from more options so I continued. The first thing to do was to create the logical disk /home.
III. The hard disk must be encrypted with the key: disc0Unir
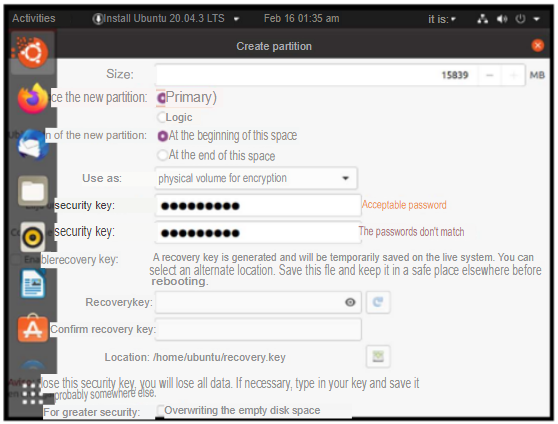
Forthe encrypted hard disk you had to select the option “physical volume for encryption” and then assign the key.
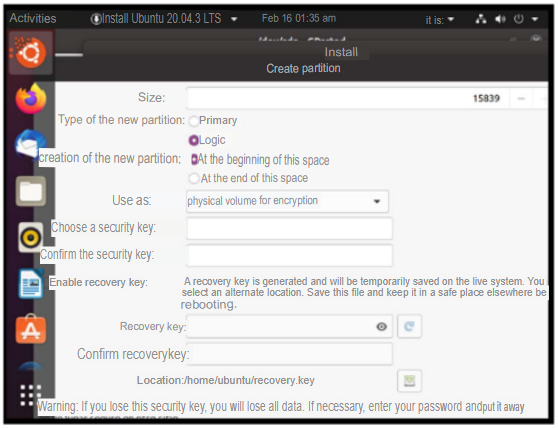
I enter the key provided by the activity document and select this disk as the primary partition to be assigned to the root.
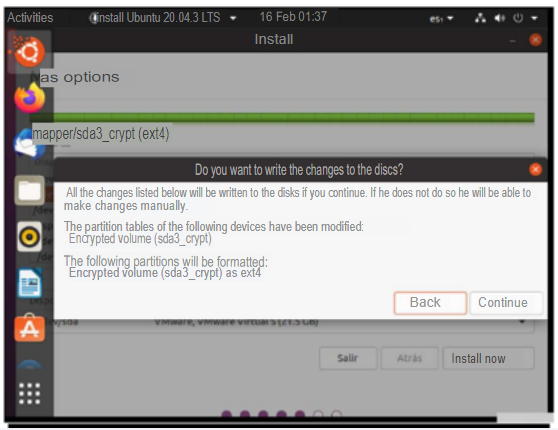
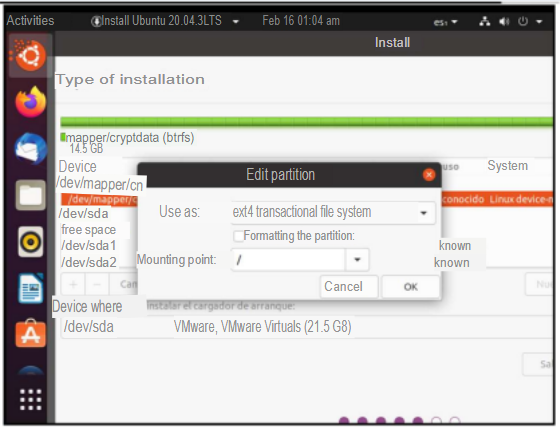
The result of how the partitions were before assigning the root, was as shown in the following image.
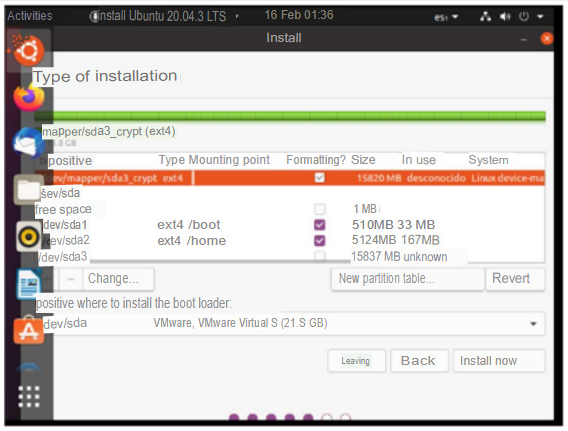
Afterwards, we simply had to mount the root directory “/” to the disk “dev/mapper/sda3_crypt ext4” as the access point.
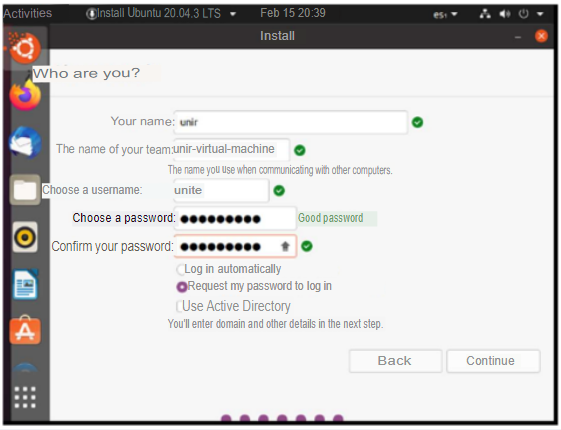
IV. The user created during the installation will be joined with a key SSSO0Unite.
Continuing with the installation the next step is to assign the user and password requested by the activity
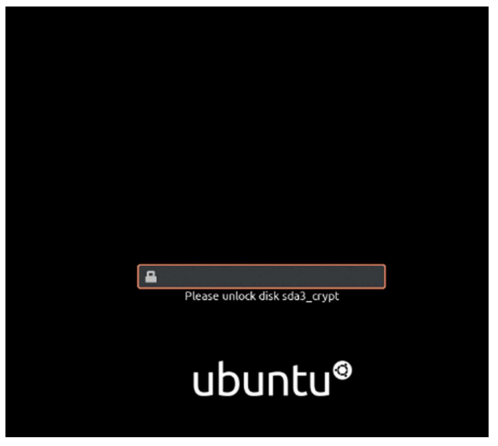
And when the installation process finished and the machine rebooted, it asked me for a password to access. So I used the password that was indicated to us disc0Unir, the same password with which I encrypted the root disk.
2. Secure grub installation and configuration
V. The grub must be protected.
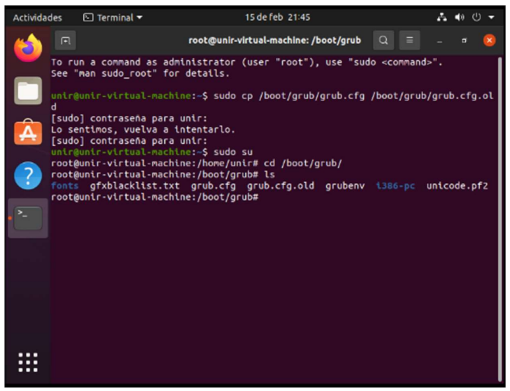
I access the user created with the password SSSO0Unir.

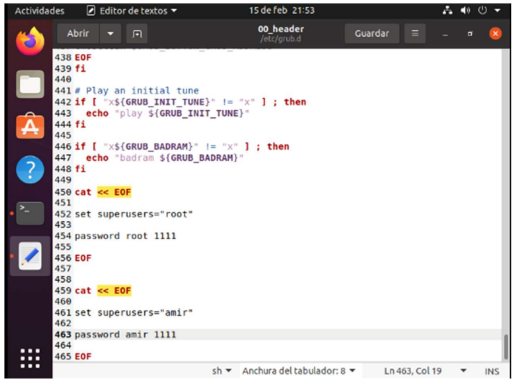
To secure the grub, I read that I had to access grub.cfg and configure the users and passwords. So first I made a copy of the settings. To have them in case I have any failure when modifying this file.
Then in the 00_hearder file I added a new user amir and to both I put the password “1111”.
But being a configuration file so easy to access and with clear text I proceeded to create a password sha512 of the key “1111” with the command grub-mkpasswd-pbkdf2.
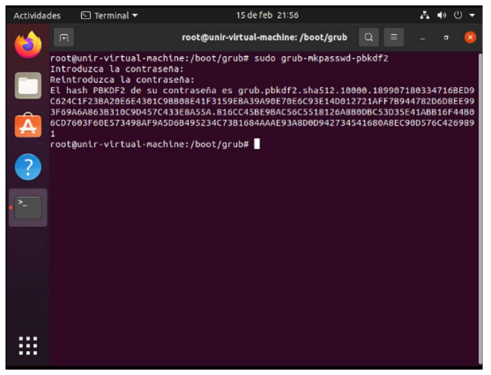
Thanks to this I got the hashed key of 1111 to
grub.pbkdf2.sha512.10000.6CE8773EA6EB70EC88ECF958524940417A982F7593DF17613160FF3E24C365E68A90F440C8C0FF12125014FE982DA992A7E2259128B4CDEE8E1857E4B483D3A1. A9C6525DF5E4D65AD11800EF3443D3C103FDD395DBE9A5FC1880C0F8E80ACCEAFDD0B75E10E4D3F8C026B793250CB56A4B3239C66CA1CE17DA6FD96D2E77B16E
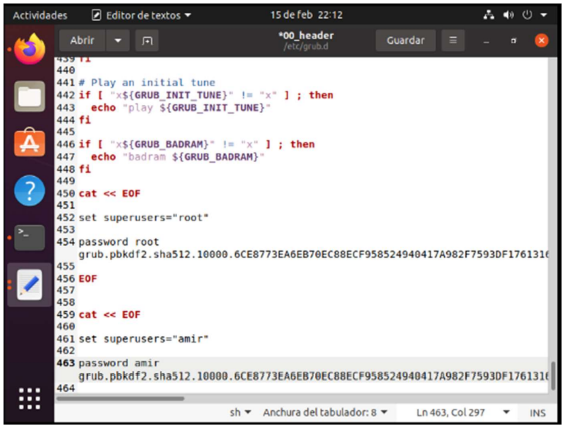
And copy this key into the 00_header file
VI. Securing su and sudo commands
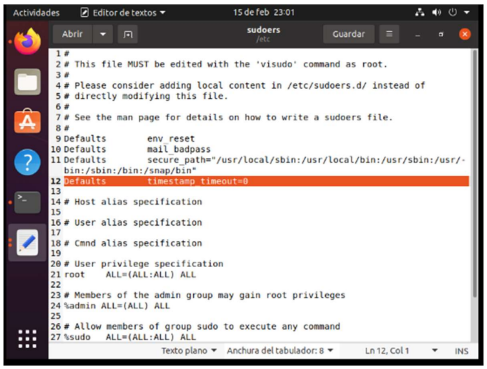
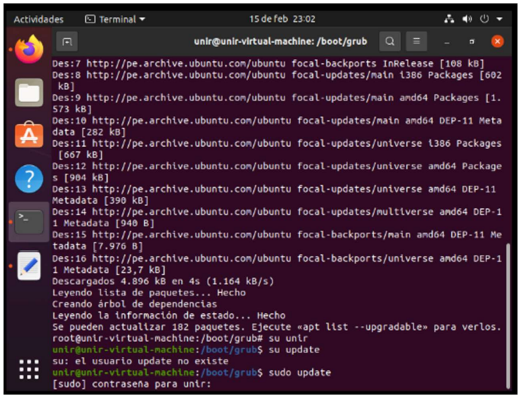
What I had to do was to secure the su and sudo commands, for this step I had to make sure that when you enter the computer if you want to access sudo it had to ask for the password immediately, because sudo by default has a time of 15 minutes before it starts asking for the password, therefore in the sudoers configuration I added Defaults timestamp_timeout=0.
To show that this was working I proceeded to try to update the distro with sudo apt update, and as shown it asked for the user’s password to join instantly.
3. IPTables Configuration
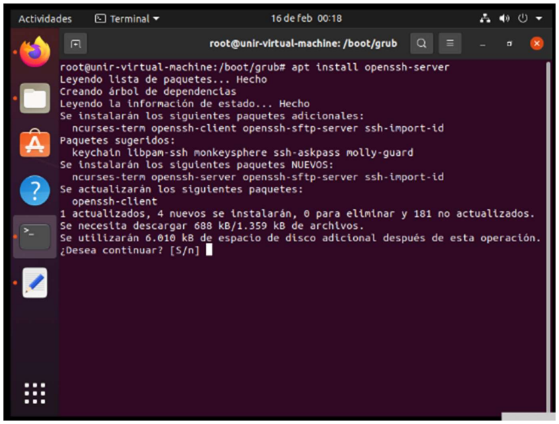
VII. OpenSSH server must be installed.
To install openssh server, the instruction to be used is apt install openssh-server and then press S.
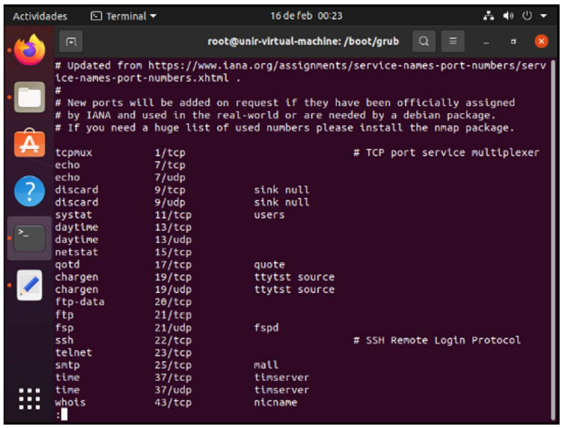
The next step is to visualize the services that are running and through which ports (this is done with the ps aux command).
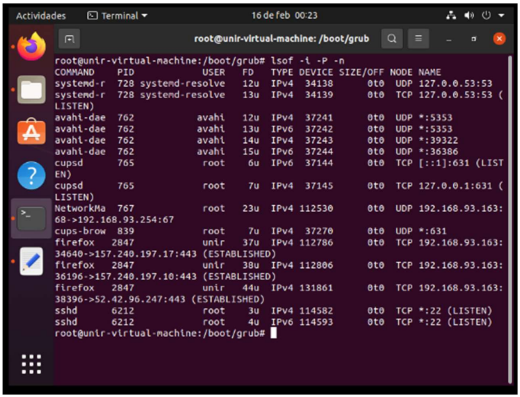
I check again with the command lsof -i -P -n, here ssh server is referred to as sshd.
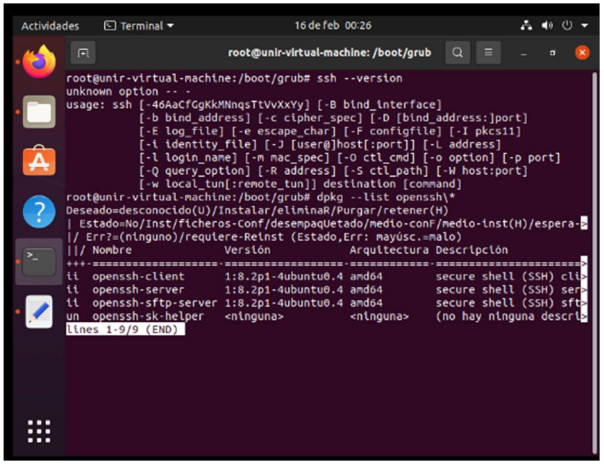
Then I check the versioning of the ssh I have installed with the command ssh – version .
VIII. Configure IPTables to only accept OpenSSH connections through port 22.
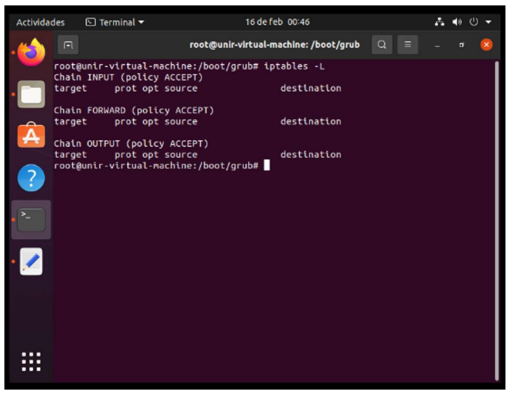
Once installed the openssh and seeing that it is running I proceed to check the iptables with the command iptables -L (As expected no ip is registered).
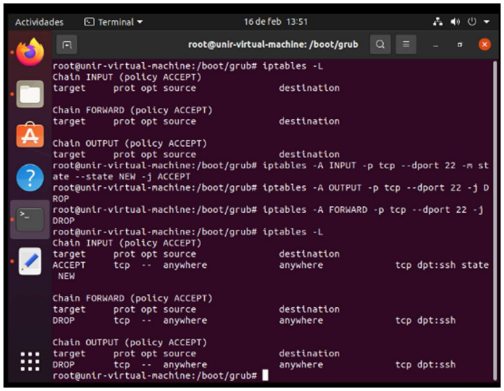
For this item we had to accept only connections on port 22 so (as we were taught in the network security course, use the commands) first allow incoming connections to the machine:
- iptables -A INPUT -p tcp –dport 22 -m state –state NEW -j ACCEPT For the outputs:
- iptables -A OUTPUT -p tcp –dport 22 -j DROP Finally, for packets that are generated by remote equipment and pass through the computer:
- iptables -A FORWARD -p tcp –dport 22 -j DROP. Then I do this check with iptables -L
4. Script and creation of users and groups
IX. The users that are going to work on the machine are from the management and engineering area. Create a script that asks us for the user name, password, its group (if it does not exist it will be added) and if it is an administrator user to allow us to create users in the system.
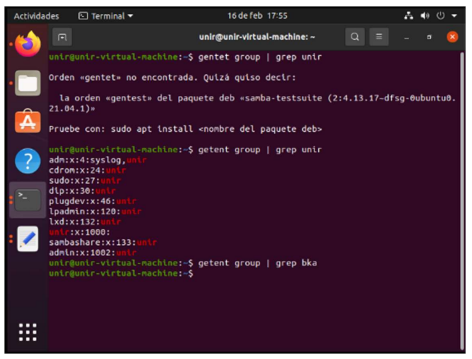
In addition, the script must verify if the user already exists in the system before adding it. First I check the existing groups with the name unir with “getent group | grep unir”, grep allows to filter the text outputs.
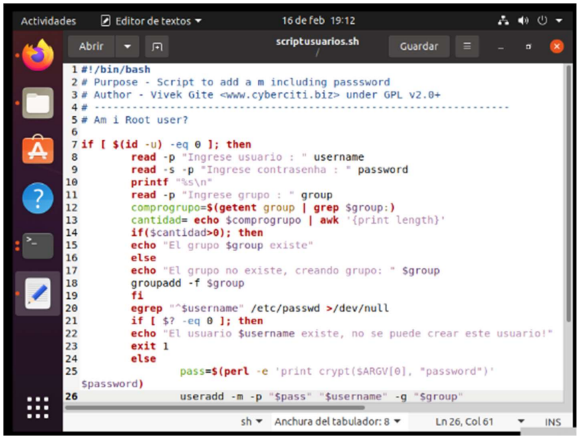
Later, I created my script in bash language, this file with extension .sh to be able to create users automatically. Requesting user, password and group
scriptusuarios.sh
#!/bin/bash
if [ $(id-u) -eq 0 ]; then
read -p "Enter user: " username
read -s -p "Enter password : " password
printf "%s\n"
read -p "Enter group" : group
comprogrupo=$(getent group | grep $group:)
cantidad= echo $comprogrupo | awk '{print length}"
if($cantidad>0); then
echo "The group $group exist"
else
echo "The group doesn't exist, creating group:" $group
groupadd -f $group
fi
egrep "^$username" /etc/passwd >/dev/null
if [ $? -eq 0 ]; then
echo "The user $username exist, this user cannot be created!"
exit 1
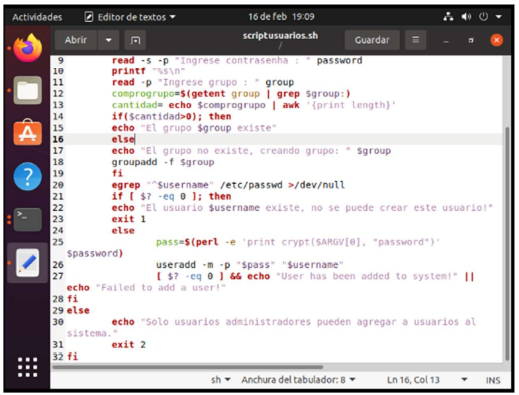
else
pass=$(perl -e 'print crypt ($ARGV[0], "password")' $password)
useradd -m -p "$pass" "$username"
[ $? -eq 0 ] && echo "User has been added to system!" || echo "Failed to add a user!"
fi
else
echo "Only users administrators can add users to the system."
exit 2
fi
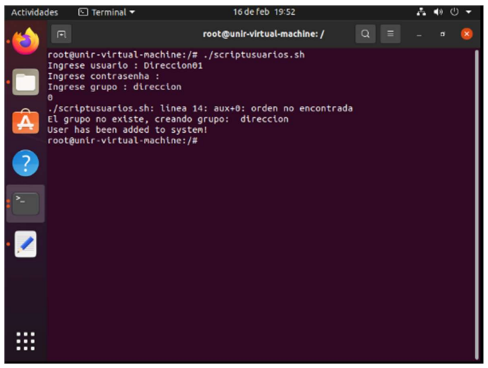
X. Using the above script, create the user Engineering01 non-administrator with the password SSSO0Ing01 and another one Address01 with the password SSSO0Dir01. It should be contemplated that new users can be added in the future.
I proceeded to test using my script run command ./scriptusers.sh and it was successful.
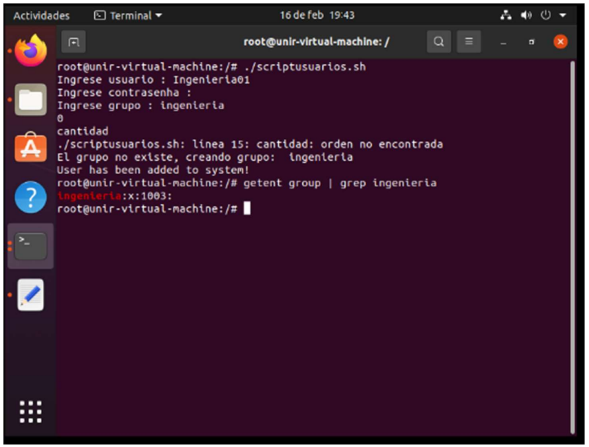
If I sent the command vi /etc/passwd, it also showed it.
For the address area I also do the same thing Address01 SSSO0Dir01 address
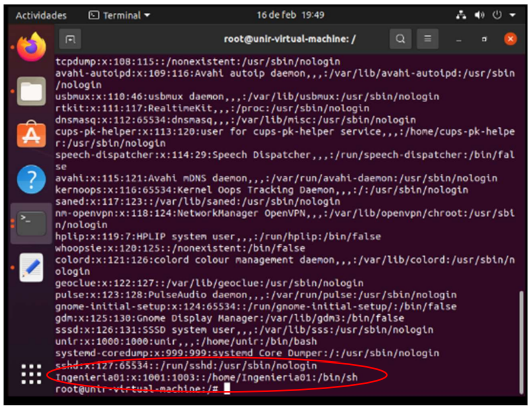
XI. List the /etc/passwd file to verify that the existing users are the ones that have been defined.
For this I again use the command vi /etc/passwd .
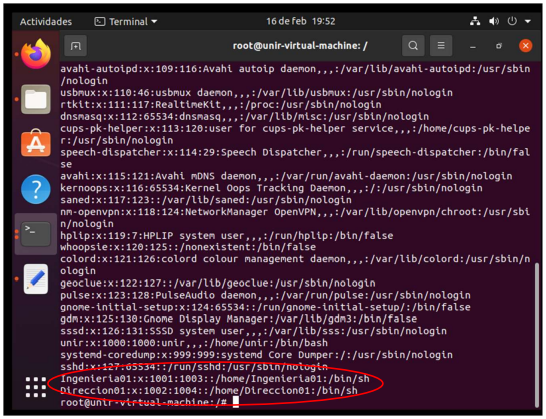
In this way, I verify that the requested users were successfully created.
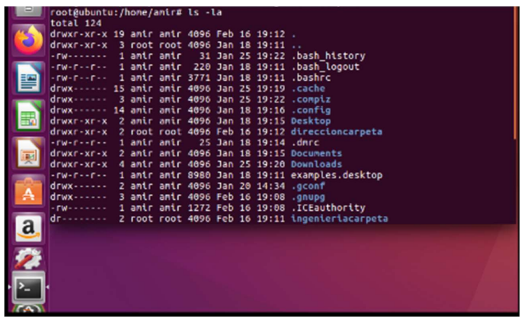
XII. The user Engineering01 will create a folder that belongs to all users of the engineering area and in which they can read and write. In turn, the users of the management area will have read access to the content located in that folder.
Previously the command install -g “groupname” -d “foldername” must be used in the same folder.
With the user engineering you had to use the command > mkdir “engineeringfolder”.
Then give read and write permissions to the created folder with> chmod -R 765 “engineeringfolder”.
In the case of address > mkdir “addressfolder”.
Then give read and write permissions to the created folder with> chmod -R 740 “folderaddress”
Chmod gives read, write and execute permissions the values are 4,2 and 1 respectively; these values are assigned to the owner, group and other users
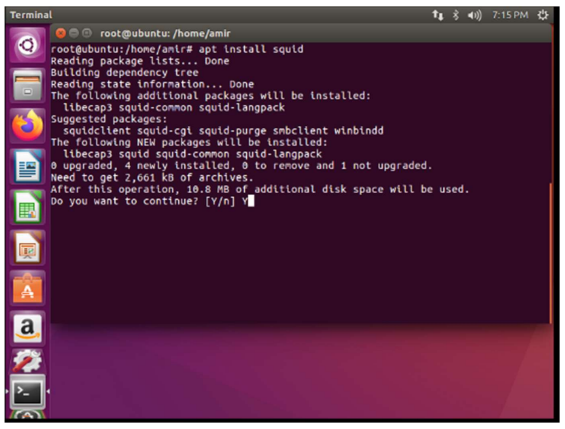
5. Squid configuration. Finally, we are asked to set up a Squid proxy server with the following characteristics:
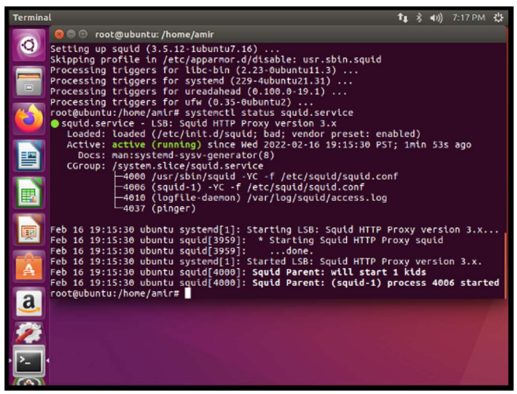
To install squid, the command apt install squid is used.
To verify that the squid service is active, use the command: systemctl status squid.service.
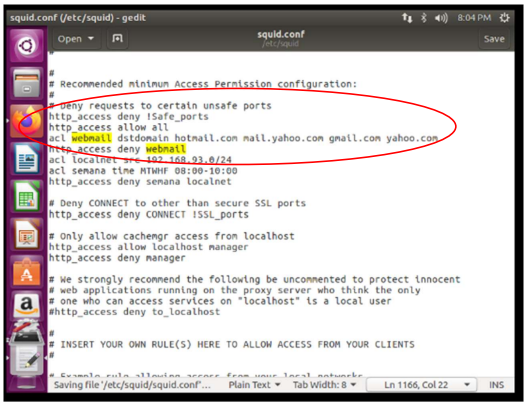
XIII. Prevent users from browsing their personal emails from gmail.com, hotmail.com, yahoo.com.
To deny access to personal emails, I had to configure the file /etc/squid/squid.conf, first I allowed all access to http with http_access allow all then I create an access control list (acl), with the name of webmail and the domains dstdomain hotmail.com mail.yahoo.com gmail.com yahoo.com, then it must be created deny access with http_access deny webmail
XIV. Restrict browsing on any day of the week between 8am and 10am.
To restrict access from 8 am to 10 am you set the ip of the local area with acl localnet src
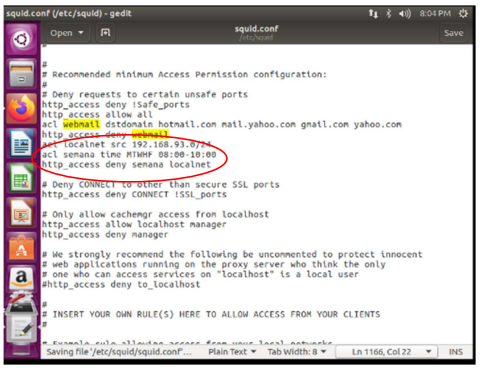
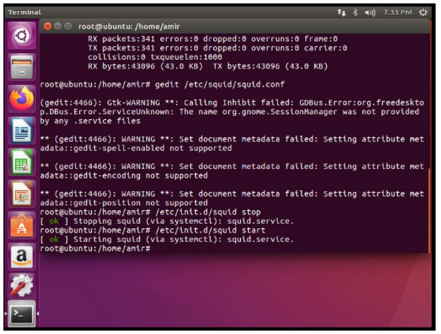
The Squid service is then restarted to execute the new configuration.
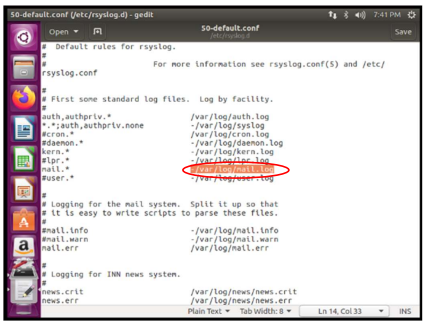
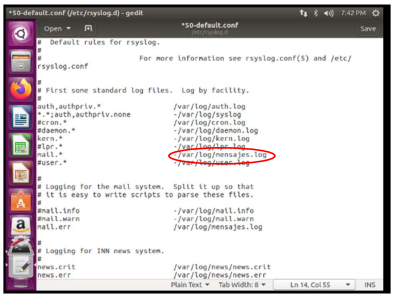
XV. That the logs are stored in a file called mensajes.log
To configure the logs I had to access /etc/syslog.conf but this refers to the files inside the /etc/rsyslog.d folder, so inside this I configure the file 50-default.conf referencing mail and mail error logs to /var/log/mensajes.log .
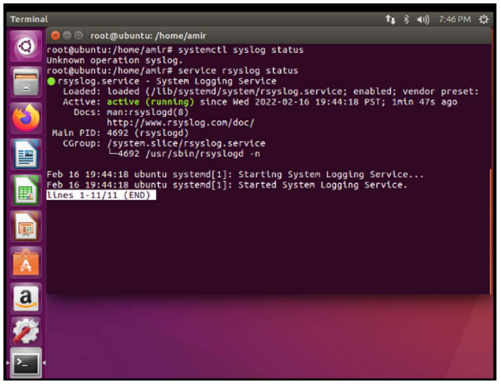
Then I restart the syslog service and check that it is active.
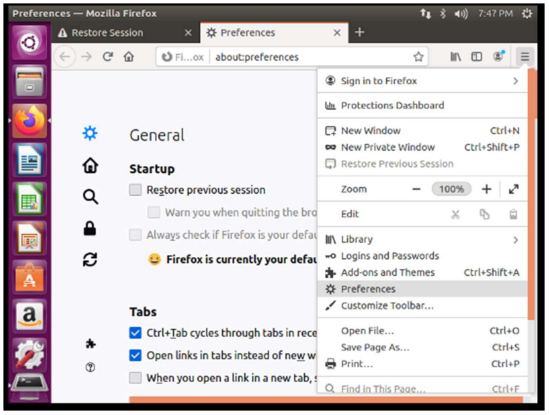
XVI. Install and configure the Firefox browser to use the configured Squid server and verify that the restrictions are correctly applied.
The next step is to configure Mozilla, so first go to preferences.
I look for proxy inside the browser and click on the tools option.
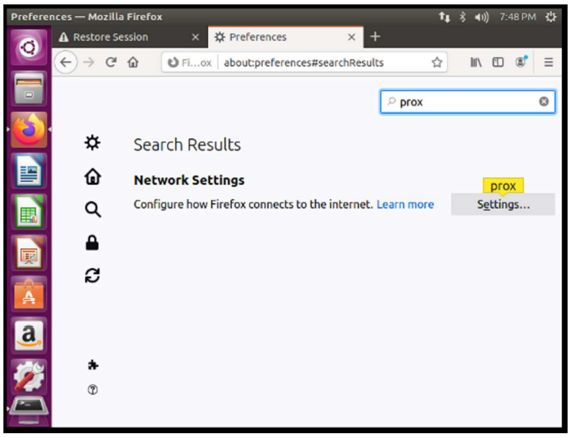
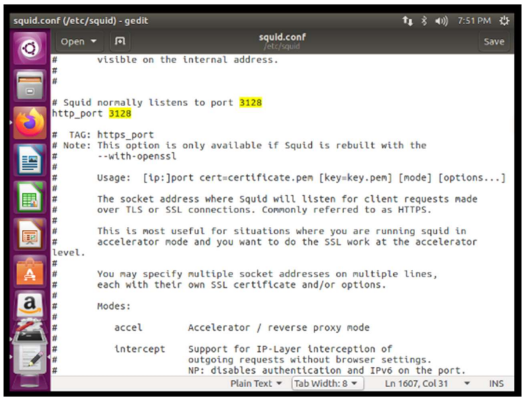
Squid has by default the port 3128 and it is where this service is executed.
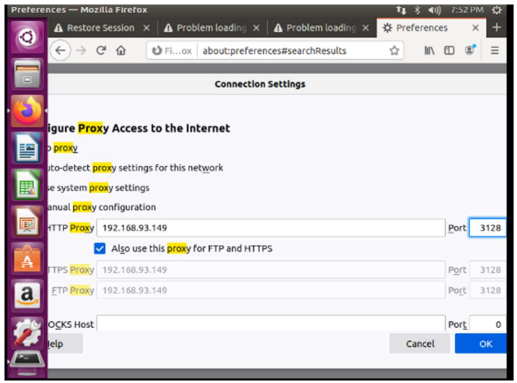
I write my own ip of the current machine in HTTP Proxy and the default port of squid, since I did not change this configuration, besides selecting to use this also for ftp and https.
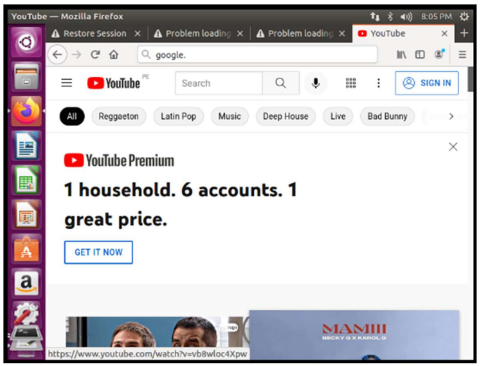
Checking that the pages which are not configured with squid are working. For this to work I had to give http_access allow all previously, as I mentioned before, otherwise it would not show any page.
And in the case of trying to access gmail.com it shows the Squid error screen.
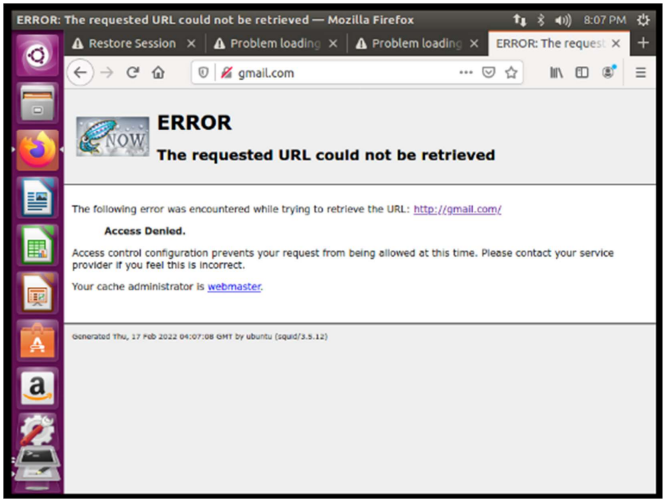
This way, I show that the proxy is working correctly.
Main References:
https://learning.lpi.org/es/learning-materials/101-500/102/102.1/102.1_01/
https://superuser.com/questions/1194229/why-cant-i-create-a-logical-partition-withgparted
https://www.youtube.com/watch?v=yRSElRlp7TQ&ab_channel=WilliMutschler
https://blog.desdelinux.net/proteger-las-entradas-de-windows-en-grub2-conpassword/
https://devconnected.com/how-to-add-user-to-sudoers-on-ubuntu-20-04/
https://www.cyberciti.biz/tips/howto-write-shell-script-to-add-user.html
https://superuser.com/questions/487312/how-to-add-a-user-to-wheel-group
https://phoenixnap.com/kb/how-to-create-add-sudo-user-centos
https://superuser.com/questions/67765/sudo-with-password-in-one-command-line
https://acloudguru.com/hands-on-labs/enabling-su-sudo-access-with-wheel-group
https://forums.opensuse.org/archive/index.php/t-500684.html
https://web.mit.edu/rhel-doc/4/RH-DOCS/rhel-sg-en-4/s1-wstation-privileges.html
https://www.cyberciti.biz/faq/unix-linux-check-if-port-is-in-use-command/
https://www.cyberciti.biz/faq/unix-linux-check-if-port-is-in-use-command/
https://www.redeszone.net/tutoriales/servidores/servidor-openssh-linuxconfiguracion-maxima-seguridad/
https://www.cyberciti.biz/tips/howto-write-shell-script-to-add-user.html
https://www.howtogeek.com/50787/add-a-user-to-a-group-or-second-group-onlinux/
https://linuxize.com/post/how-to-list-groups-in-linux/
https://linuxize.com/post/how-to-create-groups-in-linux/#:~:text=defs%20file.-,Creating%20a%20Group%20in%20Linux,by%20the%20new%20group%20name.&text=The%20command%20adds%20an%20entry,adding%20users%20to%20the%20group%20.
https://www.cyberciti.biz/faq/unix-linux-bsd-appleosx-bash-assign-variablecommand-output/
https://linuxhint.com/length_of_string_bash/
https://unix.stackexchange.com/questions/493088/write-a-script-that-accepts-groupnumbers-gids-as-parameters
https://bash.cyberciti.biz/guide/If..else..fi
https://www.cyberciti.biz/faq/systemd-systemctl-view-status-of-a-service-on-linux/
https://serverfault.com/questions/116505/squid-disallow-emailing
https://www.alcancelibre.org/staticpages/index.php/19-4-como-squid-tiempo
https://betterstack.com/community/guides/logging/linux/how-to-view-andconfigure-linux-logs-on-ubuntu-20-04
https://rm-rf.es/instalacion-basica-de-proxy-squid-y-configuracion-en-navegadores/